There’s a right tool for everything.
This can be a tough pill to swallow for some, but it’s the truth. All too often I see somebody doing way too much work because they’re trying to use the wrong tool for a specific job.
Sure, you could bang in a screw with a hammer. It would take you several minutes, but it would go in. Or you could swap out that hammer for a drill and be done in seconds and have higher quality work.
The same concept applies with software. Some software is more suited for a specific job than others.
Take DataDog for example. I don’t think anyone would argue that they are the industry leader in Application Performance Monitoring (APM). They provide unrivaled tools to monitor your cloud applications and enable you to get alerts on any metric in your system.
They even have synthetic tests. Synthetic tests are sets of API calls that pass fake data through your system to test if your environment is working as intended. It’s a relatively new piece of functionality for them and when compared to Postman, well, it falls a bit short.
Not to say the synthetic test functionality is bad, but it has nowhere near the rich feature set that Postman collections provide.
But one could make an argument to use DataDog synthetics over a Postman collection. If your company is heavily invested in using DataDog as a one-stop shop, or they need the rich APM metrics embedded from synthetics, you might choose it over Postman.
It is great for health checks and enriched trackable metrics over time. Postman has these features in their monitoring capabilities, but again, this is an area where DataDog shines. Right tool, right job.
So imagine you’ve built out a large amount of multi-step API tests in DataDog and you want to start running load tests against your system. That’s not something DataDog does. Heck, it’s not really something Postman does either.
But you can use Postman with the AWS distributed load testing tool. This tool will spin up hundreds of containers in the cloud and run your collections via Newman against your site.
The problem now is how do I get my DataDog synthetics to be a Postman collection?
Postman As Middleware
Postman is not only a phenominal API testing, building, and documenting solution, but it’s also an extremely capable middleware solution.
You can create collections that extract data from one system, transform it, then push it into another system. The tests functionality that run at the end of every request in Postman are running custom JavaScript code that allow you to do anything your heart desires.
When functioning as middleware, Postman tests can act as a transform layer to take the format of data in one system and change it to the schema of another system. We use this strategy to take the DataDog synthetic tests and convert them to a Postman collection.
To do this, we need to get the details around two APIs:
Once we have a handle on what the schemas are for the response on the DataDog API and the request on the Postman API, we’re ready to get to work.
Building the Transformation
There are a handful of things included in an API test that must be transformed. Components include:
- Requests (urls, headers, path parameters, query parameters)
- Variable chaining
- Assertions
To perform a successful conversion, we need to make sure we can transform all three of these components. If we left any of these out the value of the solution goes way down.
If we don’t convert all the requests, then we can’t complete the workflow. If we omit the variable chaining, we won’t be able to successfully pass data from one API to the other. If we leave out the assertions, then we won’t know if the system is behaving as expected.
Each one of these components is equally as important as the others.
Requests
Each API request that Postman sends in a collection is called a request. It has a number of components that define what it does and how it works. The most basic aspects to it are the url, headers, and parameters.
In DataDog, these are referred to as steps. In our conversion, we write some JavaScript to parse all the DataDog steps and build Postman requests so we can add them to the collection we are creating.
for (let step of jsonData.config.steps) {
  let postmanRequest = {
    name: step.name,
    request: {
      method: step.request.method,
      url: getUrlObject(step.request)
    }
  }

  const headers = getHeaders(step.request.headers);
  if (headers.length) {
    postmanRequest.request.header = headers;
  }
}
Variables
In the DataDog synthetic tests, you have the ability to take pieces of the API response and turn them into a variable. In our converter, we can do the same thing by setting Postman collection variables.
Lucky for us, the Postman sandbox comes preloaded with lodash, which means we can use any controls from that library in the JavaScript we write in the tests tab.
The conversion process for variable chaining is actually generating JavaScript. We’re building a script to run after the converted request runs so we can set variables used in subsequent requests. The script block for a request in Postman is an array, with each item in the array being a new line of code in the Postman console.
In DataDog, variable configuration is known as extractedValues. So our code will take the DataDog extractedValues and convert them to Postman JavaScript to be run in the tests section.
function convertExtractedValuesToScript(extractedValues) {
  const script = [];
  for (const extractedValue of extractedValues) {
    let scriptPiece;
    switch (extractedValue.parser.type) {
      case 'json_path':
        scriptPiece = `pm.collectionVariables.set('${extractedValue.name}', _.get({source}, '${extractedValue.parser.value.replace('$.', '')}'));\r`;
        break;
    }

    switch (extractedValue.type) {
      case 'http_body':
        scriptPiece = scriptPiece.replace('{source}', 'jsonData');
    }
    if (scriptPiece) {
      script.push(scriptPiece);
    }
  }

  return script;
}
You can see here that for each variable loaded with a json_path in DataDog, we are using lodash to get the value and set it to a collection variable.
To use these in Postman, we have to make one more modification. In DataDog, variables are written as {{ variableName }} with spaces around the name of the variable. But Postman does not accept spaces between the variable name and curly brackets. So we need to remove the spaces when adding the variable substitutions in our generated collection.
function convertToPostmanVariable(dataDogVariable) {
  let postmanVariable = dataDogVariable;
  const matches = dataDogVariable.match(/{{ ([^}]*) }}/g);
  if (matches) {
    for (const match of matches) {
      let noSpaces = match.replace(/ /g, '');
      postmanVariable = postmanVariable.replace(match, noSpaces.toUpperCase());
    }
  }
  return postmanVariable;
}
To do this, we use a regular expression to identify variables and remove the spaces.
With these updates, we can now chain requests together!
Assertions
An API test would have no value if there were no assertions. It would execute the APIs and indicate a pass regardless if they were successful or not. So we use assertions to verify the API is doing what we want.
With assertions, we can verify any of the following:
- The response code is a particular value
- The response time is above or below a specific threshold
- A value in the response has a specific value
Each one of these assertions are equally valuable and you have the ability to set all of them up in DataDog. So we must be able to convert them into our Postman collection.
Every DataDog step has an array of assertions. So we can take them, generate more JavaScript, and add to the variable code we have created before.
function convertAssertions(dataDogAssertions) {
  const script = [];
  for (const assertion of dataDogAssertions) {
    let scriptPiece;
    let testName;
    let operator;
    switch (assertion.operator) {
      case 'is':
        testName = `${assertion.type} is \"${assertion.target}\"`;
        operator = getOperator(assertion.operator);
        scriptPiece = `pm.expect({source}).to.${operator}(${assertion.target});\r`;
        break;
      case 'isNot':
        testName = `${assertion.type} is not \"${assertion.target}\"`;
        operator = getOperator(assertion.operator);
        scriptPiece = `pm.expect({source}).to.${operator}(${assertion.target});\r`;
        break;
      ... // omitted for readability
    }

    switch (assertion.type) {
      case 'statusCode':
        scriptPiece = scriptPiece.replace('{source}', 'pm.response.code');
        break;
      case 'body':
        scriptPiece = scriptPiece.replace('{source}', 'jsonData');
        break;
      case 'responseTime':
        scriptPiece = scriptPiece.replace('{source}', 'pm.response.responseTime');
        break;
      case 'header':
        scriptPiece = scriptPiece.replace('{source}', `pm.response.headers.get('${assertion.property}')`);
        testName = testName.replace('header', `header \"${assertion.property}\"`);
        break;
    }

    script.push(`pm.test('${testName}', () => {\r`);
    script.push(`  ${scriptPiece}`);
    script.push('});\r');
  }

  return script;
}
As the code above indicates, a DataDog assertion takes the form of a Postman test. The converter builds a test with a descriptive name then creates a Chai BDD style assertion to validate the particular value is expected.
Once the test is generated, it pushes it into the script array and moves onto the next one.
Creating the Collection
After the steps, chained variables, and assertions have all been mapped to the Postman schema, we can create a new collection in your Postman account. Using the schema we generated, we call the Add Collection endpoint in the Postman API to add it to our workspace.
When creating a collection via the Postman API, you must indicate a workspaceId to set where the collection will be generated. This is configured as a collection variable in the converter collection using the targetPostmanWorkspaceId variable.
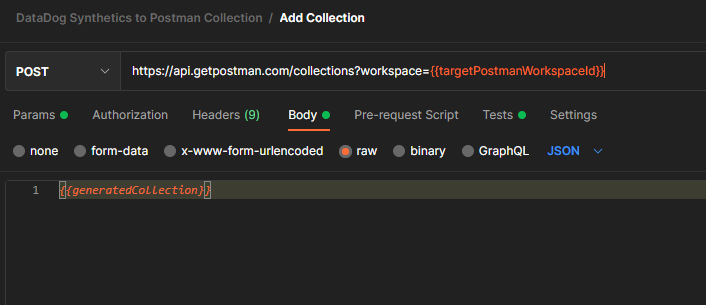
This request is light and simple, it is simply passing in our generated collection code to the API and telling Postman where to create the copy of the DataDog synthetic test in our Postman account.
Running the Conversion
The conversion takes place entirely in Postman and is available in this public workspace.
There are two collections in the workspace designed to help you find the right information. The Data Discovery collection uses the Postman API to get a list of workspaces available in your account. It also provides a way to list out your DataDog synthetic tests in a visualized table. Use the two requests in this collection to get the ids necessary for conversion.
The DataDog Synthetics to Postman Collection collection is the converter we’ve been walking through. To use it, you must configure all the collection variables with the appropriate values, then you can run it through the collection runner. Please refer to the documentation on how to find all the values necessary to run the collection.
Once you have run the DataDog Synthetics to Postman Collection collection, you should see a new collection in your workspace that exactly mirrors the synthetic test you have in DataDog!
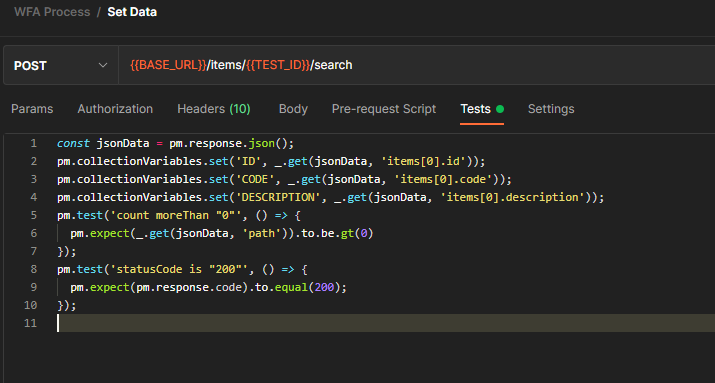
If we spot check one of the requests, you can see that the variable chaining and assertions have been generated and all variable substitutions are present. Pretty cool!
Conclusion
Postman is so much more than an API tool. It is an incredibly powerful piece of software that can be used as middleware to convert data from one system to another. It can even be used to convert data to its own format!
With the ability to run your own custom JavaScript as part of an API request execution, the possibilities are endless.
The DataDog Synthetics to Postman Collection conversion process was used because both Postman and DataDog have their specialties. If you need enhanced metrics and overall unrivaled monitoring, use DataDog to build your synthetic tests. If you want to do things like load testing, use Postman to provide that functionality.
I hope you found this informative and you use the collection! It was a fun project to work on and my goal is to help you use it to inspire you to make something great.
Happy coding!
Join the Ready, Set, Cloud Picks of the Week
Thank you for subscribing! Check your inbox to confirm.
View past issues. | Read the latest posts.