
Tutorial
 Share on:
Intro to AWS WebSockets Part Two: Auth
In my last post, we learned how to create a WebSocket API in AWS. We stood up a functional API that we can connect to and send messages from. But that was only a piece of the puzzle.
Now that we are started with WebSockets, we have to talk about security. Really we should have started with security, but that ship has sailed. We don’t want malicious users connecting to our API and attempt to take us down with a DDoS or injection attempts.
Today we are going to take what we created last week and add a lambda authorizer to it to make sure everyone who connects is a valid user of the system.
Understanding WebSocket Auth
You might be thinking to yourself, “why is this post even a thing? I know how to add a lambda authorizer to an API.”
While that might be true, there are some gotchas specific to WebSockets that you need to know. Most front-end JavaScript libraries that connect to WebSockets don’t really support standard Authorization headers.
The WebSocket API only supports the Sec-WebSocket-Protocol header when establishing a connection. Tools like Postman allow you to pass in other headers when making a connection (which is a good thing!), but when you get to writing the code for the front-end in your app, you will be stopped immediately.
To work around this while still providing us a way to connect securely, we have two options:
- Provide delimited values in the
Sec-WebSocket-Protocolheader - Provide the auth token in an
access_tokenquery string parameter
Both approaches have pros and cons, and ultimately the decision is yours to make. The solution we have deployed into our AWS accounts supports both approaches. I recommend using the query string parameter approach because it is straightforward does not repurpose the Sec-WebSocket-Protocol header.
So instead of the standard Authorization header when establishing a new connection, we will pass in a query string parameter called access_token that contains our jwt.
Another point to note with WebSocket auth - you only need to authenticate on $connect. Every subsequent call uses the same authenticated connection. That makes it easy!
Deploying Updates for Auth
If you followed part one of this series, you deployed a basic WebSocket into your AWS account. It has the ability to add and remove connections, as well as add and remove subscriptions to specific entities. Today we are going to use a branch in that repo that enhances what we had.
If you are unfamiliar with checking out non-main branches in a repository, you can run the following commands in a terminal of VS Code to check it out locally.
git fetch
git checkout part-two
Once you have the source locally, you can deploy the same way you did before: by using the sam deploy command. Before you run that, there is one more update to make to the samconfig.toml file.
In our lambda authorizer, we validate the provided jwt (a.k.a. auth token) came from a trusted source. In order to do that, we verify the jwt is signed with our secret key. The secret key can be anything you like, just be sure not to share it with others when doing this in a production scenario.
I recommend using the sam deploy --guided command to re-instantiate the parameters for this stack. Once that is completed, deploy away!
What Did I Just Deploy?
First of all, thank you for the trust. Second, you deployed the same setup as last time with a few new features.
- A new lambda authorizer
- Updated $connect lambda that stores user information (more on this later)
- Test lambda that generates a jwt using the secret you provided at deployment
- Secrets Manager secret to securely store your jwt secret
Included in the repository is a complete infrastructure diagram generated from the template.yaml file. If you don’t already include it as a common practice, I highly recommend generated diagrams. They take no effort and provide a tremendous value. Below is the full set of resources deployed into AWS to build a secure WebSocket API.
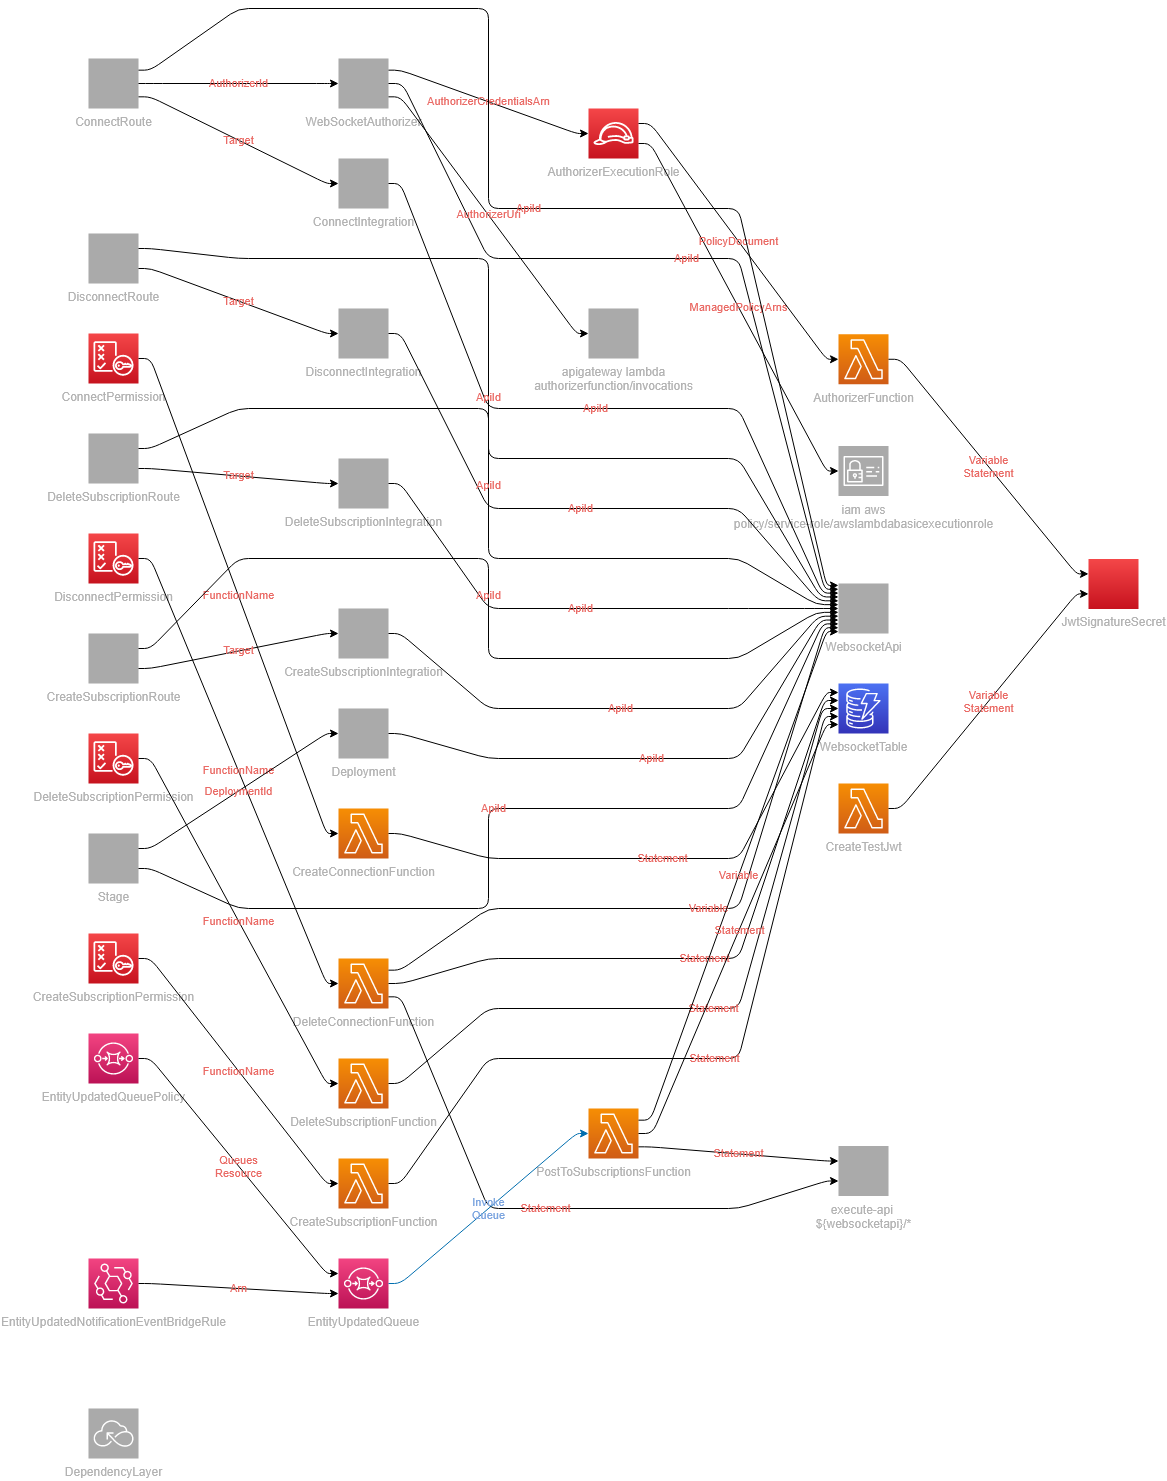 Infrastructure Diagram of a Secure WebSocket Architecture
Connecting To A Secured WebSocket
With everything deployed, it’s time to connect to our WebSocket! First, we need to verify the connection is secure. So we will try to connect to it like we did in part one of the series.
- Open the desktop app
- Select New -> WebSocket Request
- Enter the route from the output of your SAM deployment (use the
WebsocketUrioutput value) in the address field - Click the
Headerstab and add theSec-WebSocket-Protocolheader with the valuewebsocket - Hit Connect
If all goes as planned, we should receive a 401 because we did not provide an auth token.
 401 response when connecting without an auth token
Now let’s get a token and establish a connection.
- In a terminal or VS Code, enter the following command to execute our test lambda that generates a jwt
aws lambda invoke --function-name CreateTestJwt response.json
- Open the generated
response.jsonfile and copy the value in the authToken property - In Postman, add a query string parameter to the url called
access_tokenand paste the authToken value - Hit Connect
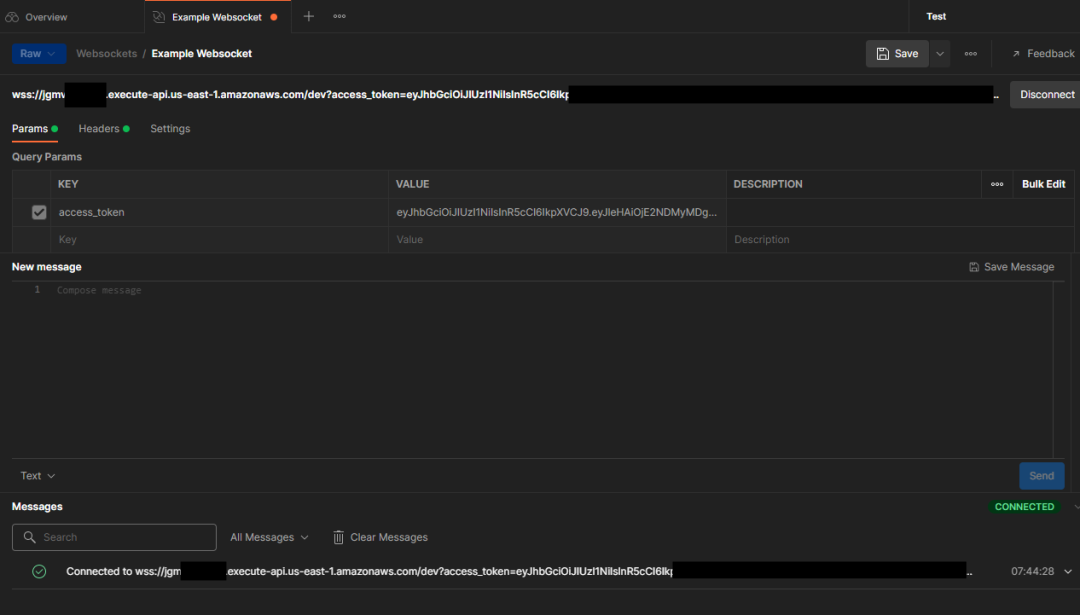 Connected successfully!!
Now that we are connected, we can send and receive messages to the WebSocket without the need for additional auth.
What Can We Do Now?
Now that our WebSocket is secure, we don’t have to worry about malicious users taking our system down. So the first thing we can do is relax.
Second, we’ve enabled ourselves to send notifications on a user-specific level. Lambda authorizers return a context object that contains data enrichments for you to use in your code. In our example authorizer, we have decoded the userId, firstName, lastName, and sub from the jwt and passed it to the $connect function.
This information is stored on the connection record in Dynamo so we can use it to send push notifications to users.
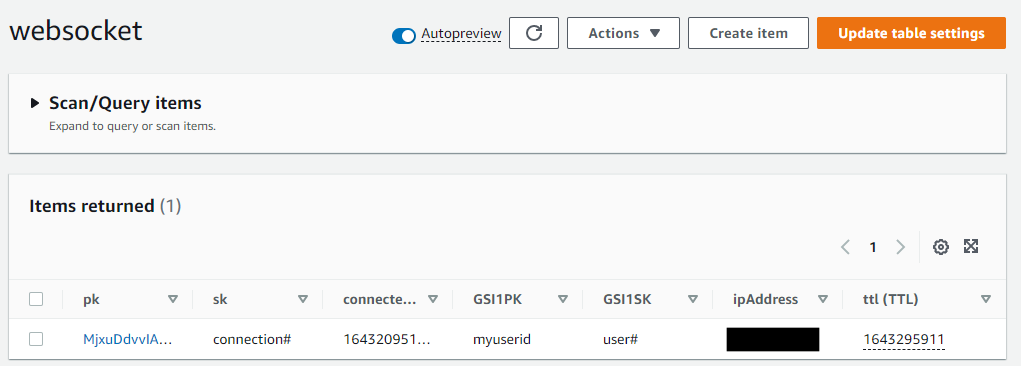 User information from the lambda authorizer
The user id is stored as the GSI1PK so we can look up connection information for a user and send them a push if we need to. This functionality is not implemented in this walk through, but we will expand on that in a future article in this series.
What’s Next?
In the year of async we’re diving headfirst into the WebSocket pool. Upcoming in the series are posts about how to document a WebSocket API using the Async API Spec, adding user-based push notifications, and moving from synchronous to asynchronous endpoints without missing a beat.
Experiment with the stack in this tutorial, get familiar with the components, and make some changes! Happy coding!
Update
The WebSocket series is complete. If you would like to continue on, please refer to the following:
Part Three: Documenting with Async API Spec Part Four: Adding User Notifications and Error Handling Part Five: Adding a Custom Domain
Happy coding!

Join the Ready, Set, Cloud Picks of the Week
Thank you for subscribing! Check your inbox to confirm.
View past issues. | Read the latest posts.