Application development
 Share on:
How To Build a CI/CD Pipeline in AWS in 5 Minutes and 58 Seconds
If you’re anything like me, you don’t want to spend your time fighting with DevOps procedures anymore. Getting code to build and deploy has got to be a solved problem, right? Right.
AWS has CI/CD nailed down. For clarity, CI/CD stands for Continuous Integration, Continuous Delivery. Simply put, if you have a CI/CD pipeline, whenever you push code to your repository, it will automatically compile and install your software in your development environment. Sound nice? It is.
Let’s walk through how you can make a fully managed pipeline from the ground up in less than six minutes. I’m talking creation of the repository and pipeline and being built and deployed in the cloud in that amount of time. Let’s get started.
Prerequisites
This pipeline uses the SAM template to build and deploy a serverless application. You will need to install the AWS CLI and SAM CLI and give your AWS user account Git credentials before we begin.
Create the Repository
We are going full AWS in this solution, so for our repository management, we are going to be using CodeCommit. CodeCommit is a Git-based repository management service. So step one, log into your AWS account, select a region, and open up the CodeCommit console.
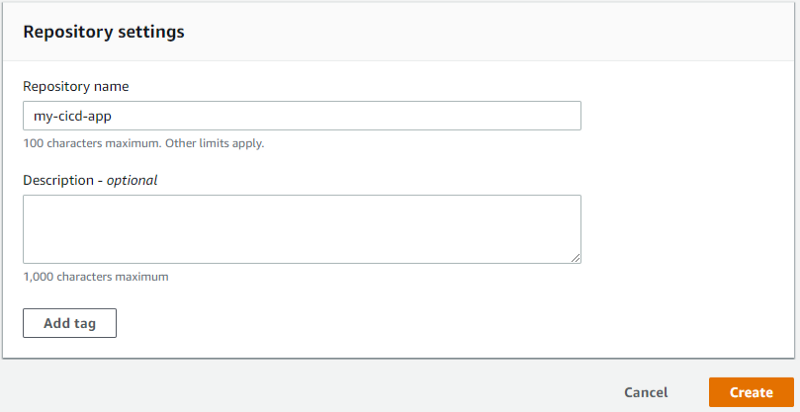
Hit the Create Repository button and give your new repo a name.
The Initial Commit
On your machine, navigate to the directory where you store your workspaces and pull down the empty repository you just made. CodeCommit offers both HTTPS and SSH options for Git, so use whichever you prefer.
Now we need to add our HelloWorld lambda function. The SAM template can help us with that:
sam init –name my-cicd-app –runtime nodejs10.x
This will generate a basic Hello World lambda function for us, written in NodeJS 10. However, we are missing one thing for our pipeline: a buildspec.yml file. For our quick pipeline, we will just use a minimal file. You can add as much or as little to this file as you want.
Add this file to the root of your project, commit, and push to master.
Create an S3 Bucket
Your repository is going to need a place to store the build artifacts. We will use Amazon S3 for our storage service. The build command we used in our buildspec.yml will automatically drop all artifacts in this bucket for us.
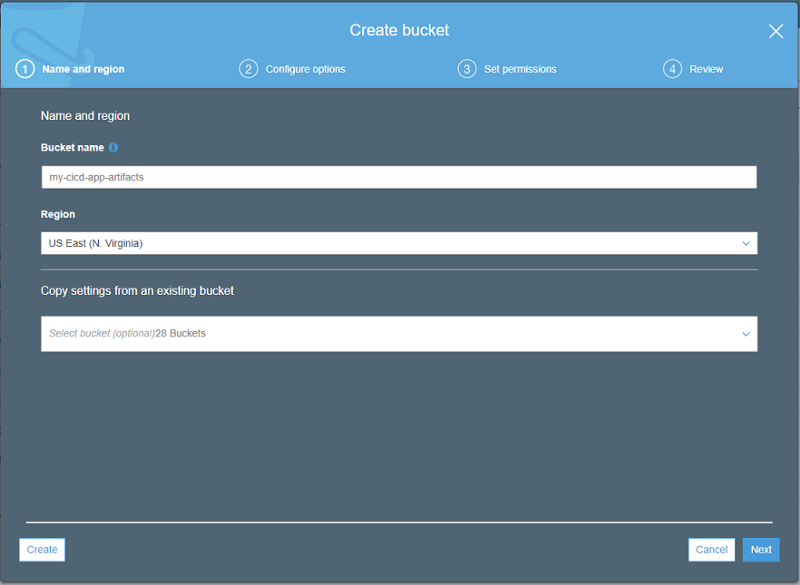
Navigate to the S3 console and hit Create Bucket. Give your bucket a name, but be aware that S3 bucket names need to be globally unique. That means that nobody else in the world may have a bucket with the same name as you. For a general guideline, I like to name my buckets (project name)-artifacts.
Create a Pipeline Role
Everything in AWS is managed by roles through the IAM service. Before we set up our pipeline, we need to build a role that will allow our pipeline to perform everything it needs.
Navigate to the IAM console and hit Roles on the navigation pane. Click the Create role button to bring up a new role screen.
Select AWS Service for the “type of trusted entity” and CloudFormation for the “service that will use the role_.”_ Hit Next: Permissions to continue.
Since your pipeline will be creating any number of resources and will need to perform tasks in almost every area of AWS, we need to give this role AdministratorAccess. Select the checkbox next to the AdministratorAccess permission and hit Next: Tags.
You can add tags if you’d like, but we don’t need them now for our pipeline, so hit Next: Review.
Lastly, give it a name that is meaningful to you. This role can be reused for all your pipelines, so I like to give it a generic name like CloudFormationAdminRole. Once you name your role, hit Create Role.
Build the Pipeline
There are three pieces to a basic CI/CD pipeline:
- Source Control
- Build
- Deploy
We have already set up source control with CodeCommit, but we still need to configure the build and deploy pieces. Luckily, AWS CodePipeline will walk us through assembling those and connect them for us.
Navigate to the CodePipeline console in AWS and hit Create Pipeline.
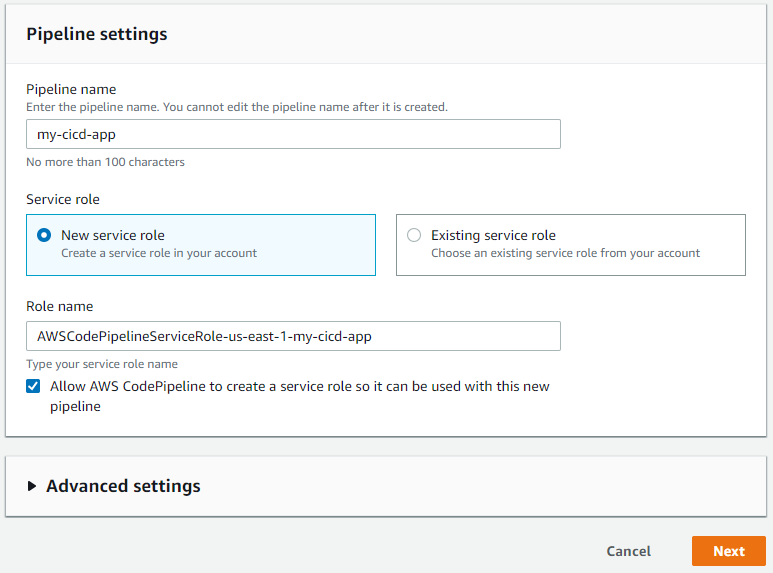
Give your pipeline a name. I like to use my repository name to easily keep track of things. Notice the Role name field will fill out as you type in a name. Hit Next.
You have already made your repository and done the initial commit, so the next screen will be easy.
- Source provider: AWS CodeCommit
- Repository name: Your repository name (my-cicd-app for this tutorial)
- Branch name: master
Leave CloudWatch Events as the detection option. It will trigger the pipeline to run whenever a push has been made to your repository. The other option will poll every so often to see if a change has been made. Hit Next.
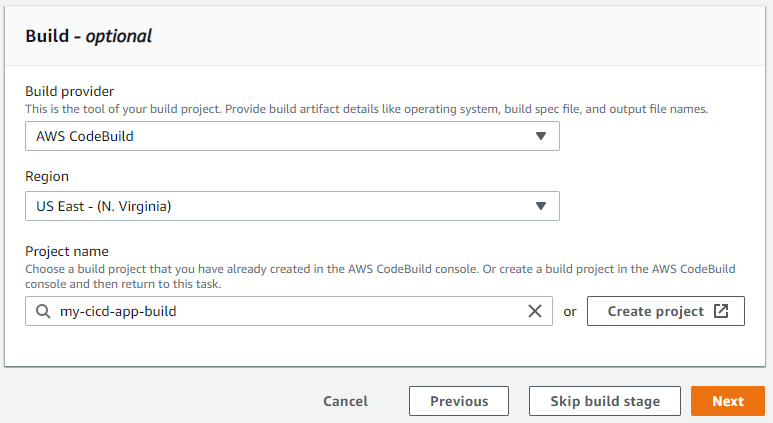
Now we need to set up a build for our project. Select AWS CodeBuild in the Build provider_._ Next, hit the Create Project button. This will open a dialog that will walk us through creating a new CodeBuild project.
There are many fields in this dialog, so I will include only the ones you need to configure.
- Project Configuration > Project name: The name for your build. I follow the naming convention “(project name)-build”
- Environment > Operating system: Amazon Linux 2
- Environment > Runtime(s): Standard
- Environment > Image: aws/codebuild/amazonlinux2-x86_64-standard:1.0
- Environment > Additional configuration > Environment variables > Name: BUILD_OUTPUT_BUCKET
- Environment > Additional configuration > Environment variables > Value: The name of our S3 bucket. Our example is
my-cicd-app-artifacts
Leave all other fields defaulted and hit Continue to CodePipeline. This will close the dialog window and bring you back to the Add build stage screen.
Our build should now be populated in the Project name field. Hit Next.
Next, we are going to configure the deployment stage. Select AWS CloudFormation in the Deploy provider dropdown. Fill out the other fields as follows:
- Action mode: Create or update a stack
- Stack name: Use the project name. Our example is
my-cicd-app - Artifact name: BuildArtifact
- File name: packaged.yaml (this gets generated from our buildspec.yml)
- Capabilities: Select both CAPABILITY_IAM and CAPABILITY_AUTO_EXPAND
- Role name: Use the role we created for the pipeline. Our example is CloudFormationAdminRole
Hit Next to go to the review page. Hit Create pipeline to trigger AWS to build all the pieces and stick them together.
Update the Build Permissions
As stated earlier, everything in AWS is driven by roles and permissions. For our pipeline, CodeBuild is going to need permissions to put our build artifacts in the S3 bucket we created. So we need to navigate back to the IAM console.
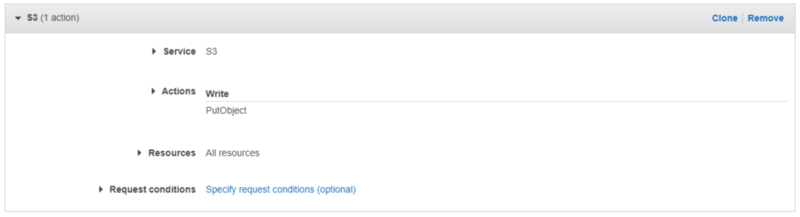
We are going to create a new policy that can be reused for all pipelines going forward. Click on Policies in the navigation pane and hit Create Policy. Fill out the following values:
- Service: S3
- Actions > Write: PutObject
- Resources: All resources
Click Review policy and give it the name AddArtifactsToS3. Hit Create policy.
Click on Roles in the navigation pane and search for our CodeBuild role. It should be named “codebuild-(project name)-service-role.” Click on the role to edit it.
We need to attach the new policy to the CodeBuild role, so hit Attach Policies and search for AddArtifactsToS3. Hit Attach Policy to continue.
Run the Pipeline
Chances are the pipeline ran and failed while we were setting up the permissions for CodeBuild to write to S3. So we want to trigger the pipeline to run again now that it has the correct permissions.
Navigate to the CodePipeline console and select your pipeline from the list. Hit the Release change button to kick off the pipeline.
The entire process should now run without error. Once it completes, you should have your Hello World function deployed and accessible!
Enjoy!
At this point, you should be able to start modifying the buildspec and template files to make your own project. Resources will automatically get deployed for you every time you push.
You can now focus your attention where it really matters, the business. Spend your time innovating and creating value, not fighting deployment scripts and monitoring infrastructure.


Join the Ready, Set, Cloud Picks of the Week
Thank you for subscribing! Check your inbox to confirm.
View past issues. | Read the latest posts.