Proof of concept


How to Automate OAuth2 Token Renewal in Postman
Postman is a powerful tool that has an unbelievable amount of functionality. Included in the functionality is the ability to build authorization headers for 9 different authorization and authentication methods. The support comes out of the box and several of them can be parameterized. However, the OAuth2 method requires you to manually click a button to renew the token when it expires.
This can be a burden when you are running tests for an extended period of time and you continue to get disrupted by having to renew the access token. So let’s improve the process. There is a way so you never have to hit that “Get New Access Token” button again.
Since you’re here, I assume you already know what OAuth2 is, so I’ll cut straight to the point. You are going to need to set up a few variables, but before we do, let’s talk about the different types of variables we will be using.
- **Collection variables **— These are immutable variables that belong to a particular collection. They are only relevant to the requests in the collection, and do not need to be shared across multiple collections. Since pre-request scripts and test scripts cannot update the values of the collection variables, be sure you only use these for static values.
- **Environment variables **— These are variables that can span across collections and are usable in any request. Pre-request scripts and test scrips are able to update the values of these variables, so values that are subject to change, like an access token, need to be added as environment variables.
The key to the automation is in a collection pre-request script. This script will run before every request in the collection, so we only need to write this code once to make our lives easier. Here is the script we will be adding to the collection:
// Refresh the OAuth token if necessary
var tokenDate = new Date(2010,1,1);
var tokenTimestamp = pm.environment.get("OAuth_Timestamp");
if(tokenTimestamp){
  tokenDate = Date.parse(tokenTimestamp);
}
var expiresInTime = pm.environment.get("ExpiresInTime");
if(!expiresInTime){
    expiresInTime = 300000; // Set default expiration time to 5 minutes
}

if((new Date() - tokenDate) >= expiresInTime)
{
   pm.sendRequest({
      url:  pm.variables.get("Auth_Url"),
      method: 'POST',
      header: {
        'Accept': 'application/json',
        'Content-Type': 'application/x-www-form-urlencoded',
        'Authorization': pm.variables.get("Basic_Auth")
      }
  }, function (err, res) {
      try{
        pm.environment.set("OAuth_Token", res.json().access_token);
        pm.environment.set("OAuth_Timestamp", new Date());

        // Set the ExpiresInTime variable to the time given in the response if it exists
        if(res.json().expires_in){
            expiresInTime = res.json().expires_in * 1000;
        }
        pm.environment.set("ExpiresInTime", expiresInTime);
      }
      catch(e) {
        console.log('Unable to load access token from response);
      }
  });
}
Woah, there’s a lot going on here. Let’s start by breaking down the variables:
OAuth_Timestamp— Responsible for saving the DateTime the access token was issuedExpiresInTime— Holds the value in milliseconds for how long the access token is valid forAuth_Url— The endpoint of the authentication server. This url is responsible for retrieving the access tokenBasic_Auth— If your OAuth2 is using the “Client Credentials” grant type, then you can use this variable to pass in a basic authentication header with your Client Id and Client SecretOAuth_Token— Holds the value of the access token returned by the Auth_Url
What Is The Script Doing?
- Checking to see if the access token has expired
- If it has, it will make a call to the authentication server to retrieve a new access token
- Sets the access token to an environment variable and records the time the access token was granted
Now that we understand what the script is doing, let’s figure out which variables need to be collection variables, and which ones need to be environment variables.
Collection Variables
As stated before, collection variables are static values that do not need to span across multiple collections. In our case here, the variables that would hold static content are:
Auth_UrlBasic_Auth
The only time either of these variables would need to change would be if you changed the endpoint of your authorization server or your client id/secret changed.
Environment Variables
Now for the variables that have dynamic content. These are the variables we are changing the value of in the collection pre-request script. The environment variables we need to build for automatic access token renewal are:
OAuth_TokenOAuth_TimestampExpiresInTime
Piecing It All Together
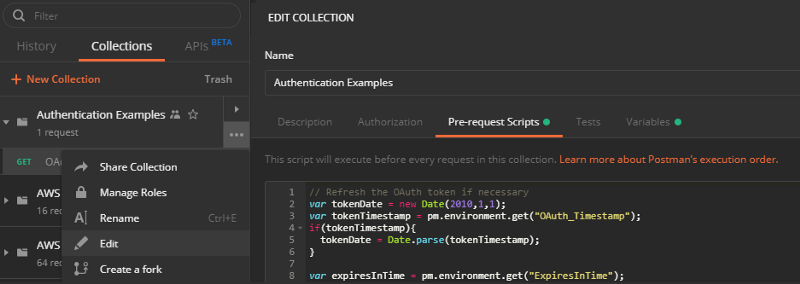
Now that we understand what the script is and what the variables are, it’s time to add it all in Postman. To add the pre-request script to the collection, click on the “More” dots next to the collection and select “Edit.” Navigate to the Pre-request Scripts tab and paste the script from above.
While still in the “Edit Collection” window, click on the Variables tab and add the two collection variables we stated before and their values. Hit “Update” to save and continue.
Next, go into your environment and add the three variables in there. You do not need to set the values of these. They will change on the first run.
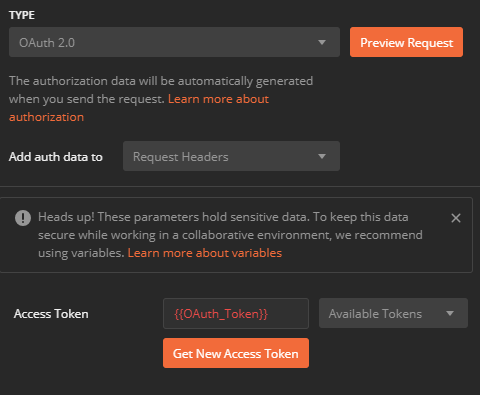
The last thing you need to do is update all your requests to use the {{OAuth_Token}} in the Access Token field on the Auth tab. After you update your requests to use the variable, you are good to go! The script will run automatically before every request in the collection and reset the access token whenever it is expired. You can use this method on all collections that require OAuth2.
Have you solved this problem in a different way? I’d love to know what you did and how you did it!

Share on:
Join the Ready, Set, Cloud Picks of the Week
Thank you for subscribing! Check your inbox to confirm.
View past issues. | Read the latest posts.