
API

API First Development: How to Build Consistent, Meaningful APIs with Postman
We live in a truly revolutionary time.
Household items are getting smarter, services assume your behavior (and are usually right!), and things just get done….automatically.
Between AI and ML rapidly getting introduced into our lives, things are progressively getting easier. More convenient. Better.
When my alarm goes off in the morning, I can have it trigger my towel warmer to turn on. By the time I’m done with my shower, I have a nice hot towel to dry off with. How does this happen? Is everything connected?
In a sense, yes.
Just about everything and their grandma has an API (Application Programming Interface) enabling access and control of certain features.
- Your smart lightbulb? API.
- Your to-do list? API.
- Sending a text message? API.
With public facing APIs becoming the norm, standards must be put in place so connecting services together is easy and intuitive.
Let’s discover how you can start bringing consistent APIs to your apps so you can join the revolution.
The Platform
You want a place where you can design, develop, test, and observe all in one. Enter Postman.
Postman handles all components of the API lifecycle, providing a seamless experience for all members of a development team.
Analysts can describe the data shape, developers can build the endpoints and connections to backend code, QA can verify responses adhere to the design, technical writers can build beautiful documentation in Markdown, and automation engineers can build complex workflows to test it.
Not to mention, the application allows for full source control and commenting/collaboration on almost every component.
The Objective
When you decide to go API first, what exactly are you committing to? What gives you the ability to say that?
Think about your consumers for a second. Both internal and external. What would they want out of an API?
- Consumability
- Consistency
- Clear documentation
The three C’s. The consumer doesn’t care about your build pipeline or your dev practices. They care about the final product. They care about these three simple things.
Your goal as the engineering team is to provide an API that satisfies these requirements (and solving the business problem, too!). You do this by putting the effort up front to provide the best experience possible when consuming your API.
Consumability
There are several types of APIs you can build, and Postman has the ability to handle all of them. But we want to get in with the big guns. Our API should sit side by side with companies like Google, Microsoft, ebay, and IBM.
So we will make a REST API defined by the OpenAPI Specification (OAS).
Adhering to a standard not only gives us an easy reference guide for format, but it also provides us with working examples, community support, and increased consumability due to a familiar structure. Chances are the consumers of the API have seen OAS before, and that’s exactly what we want.
Best of all, it comes fully supported in Postman, so all we have to do is hit New > API and fill out the form below.
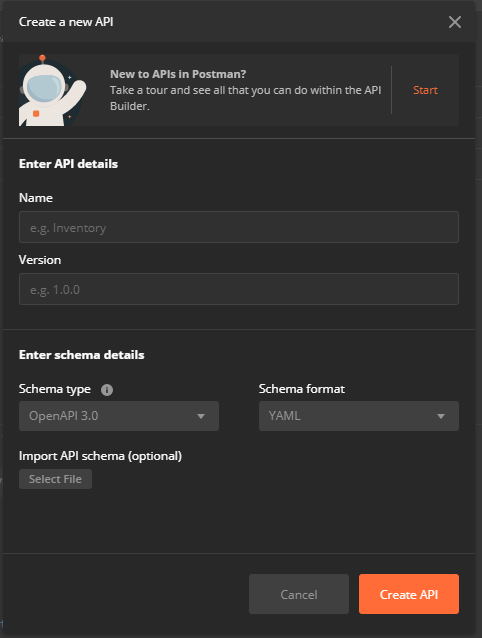
New API dialog in Postman
Designing API First
With an API first mindset, you are going to define your endpoints, the shape of the data in your requests and responses, and expected status codes before you write a single line of code.
With OpenAPI, this is easily manageable. In fact, the main pieces of your OAS file are paths (the endpoints) and components (requests and responses). Defining these major pieces will allow us to visualize the shape of the API and show us what we are going to be able to do with it.
In my fictional business, Gopher Holes Unlimited, we want to track two main types of entities: Gophers and Holes. The first thing we need to do is figure out what the data elements are for a gopher and for a hole.
Below is the Hole entity defined in OAS3.0 with every field given a meaningful description and an example as defined in the components\schemas section:
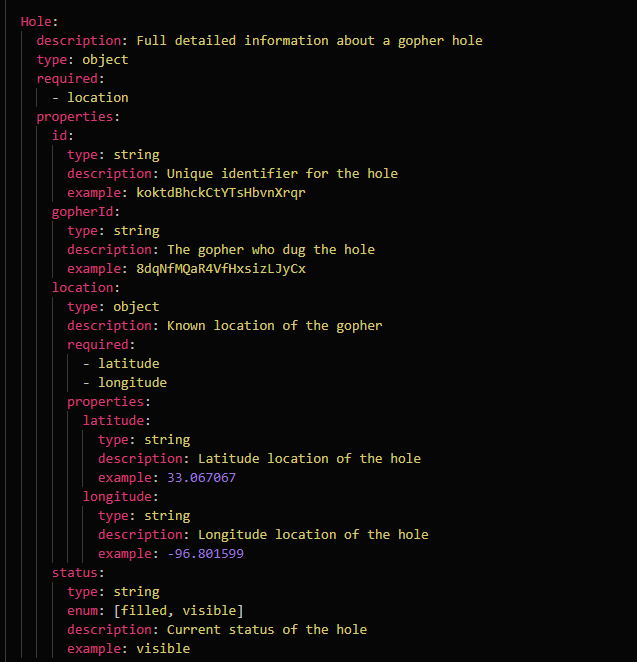
You can see that the only field we require is location but we have plenty of other properties that can be used to help define the hole.
We will do the same thing for Gopher then move on to defining our endpoints.
Our business is about helping people track gophers and their holes. So we need endpoints that will easily provide that kind of functionality.
- Add a new gopher/hole - POST
- Update gopher/hole details - PUT
- Get a list of all gophers/holes - GET
- Get details about a specific gopher/hole - GET
- Add a new status to a hole - POST
With these requirements in mind, we can build out our endpoints in the OpenAPI spec using the proper http methods and REST structure.
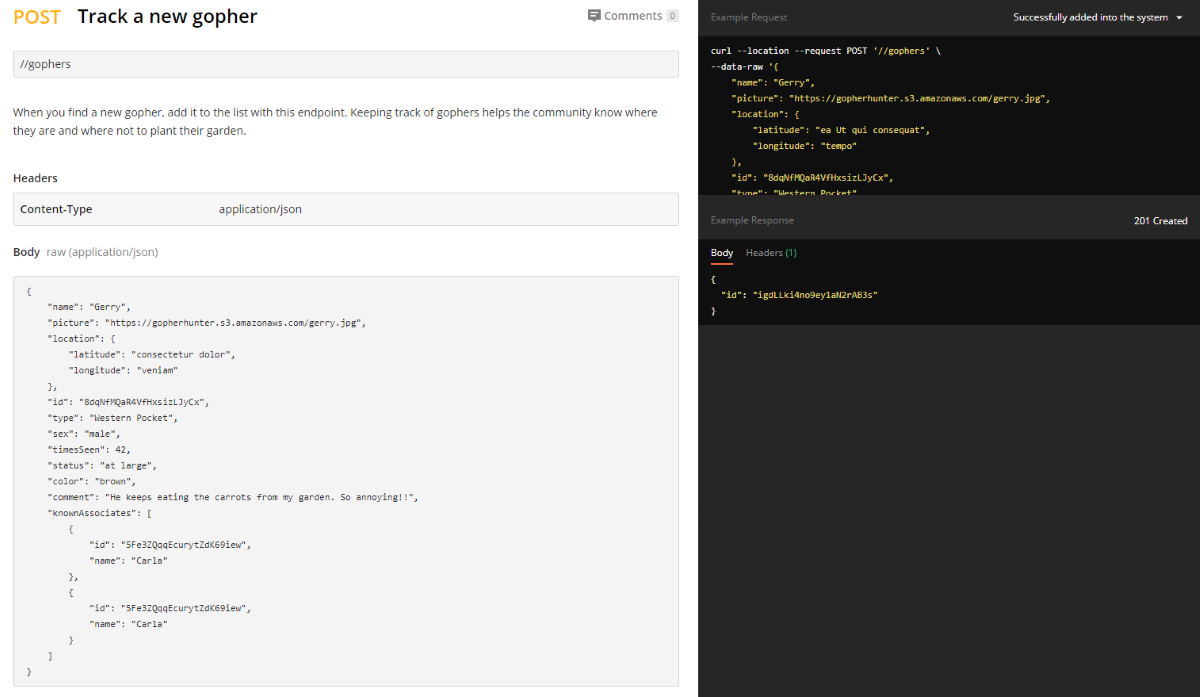
In the paths section of our spec, we define something that looks like this:
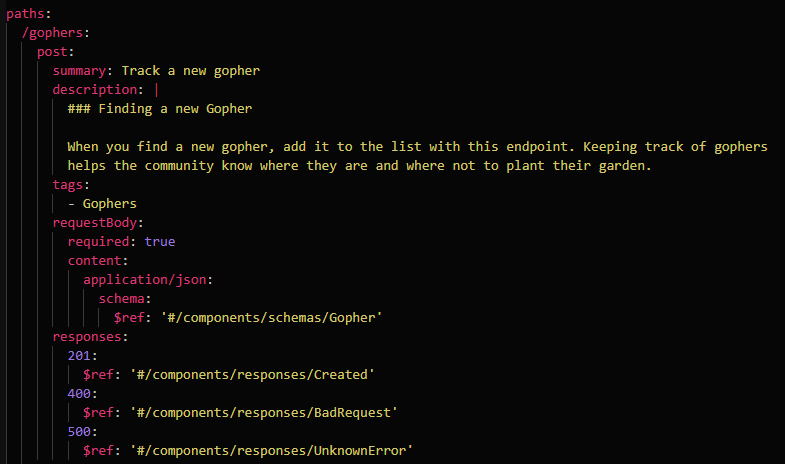
We made the endpoint /gophers, set it to be a POST, and gave it a summary and meaningful description in Markdown. We also used our Gopher entity as the definition of the body and declared some standard responses that can come back from a POST.
Now all we have to do is continue this format for the rest of our requirements, and we’ll have ourselves a defined API! To save us some time, I’ve already done that for you and included it in the GitHub repo for Gopher Holes Unlimited.
To get the Gopher Holes Unlimited API setup in your Postman workspace, do the following steps:
Fork the
gopher-holes-unlimitedrepo and clone it onto your machineIn your Postman workspace, hit New > API and fill out the dialog
Connect the API to the OAS file in GitHub
- Select the API from the
APIstab - Click on the
Definelink - Click the
Connect Repositorybutton - Follow the guide to connect Postman to the repo
- Select the API from the
Preview Your API
It’s one thing to look at a definition of an API. But it’s another thing entirely to see it in action. Once again, since we’re building this API first, we don’t want to write any code yet. We’re still in the definition phase.
Time to use Postman for what it does best - sending web requests.
With our API created and synced with the source code, we need to create a mock server that will accept requests at our endpoints and return the example values we defined in our spec.
After selecting the API in Postman,
- Click on the
Developtab - Hit Add Mock Server > Create new mock server
- Give the mock server collection a name, and change the
Folder Organizationadvanced setting toTags
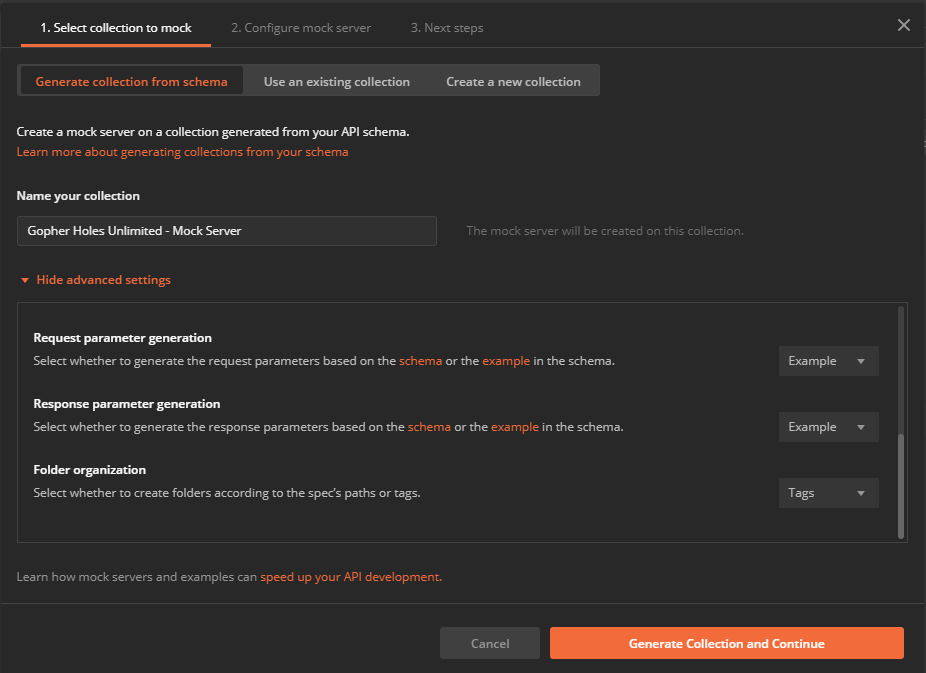
- On the next screen, name the mock server and select the
Save the mock server URL as an environment variablecheckbox - Hit
Create Mock Server
Now we have a server stood up with examples so we can test our API!
Behind the scenes, Postman built a collection with example requests and responses based on our OAS file. It also set us up a web server with the endpoints we defined and configured it to return the examples. The mock server will return responses defined in the linked collection, so be careful when you modify requests!
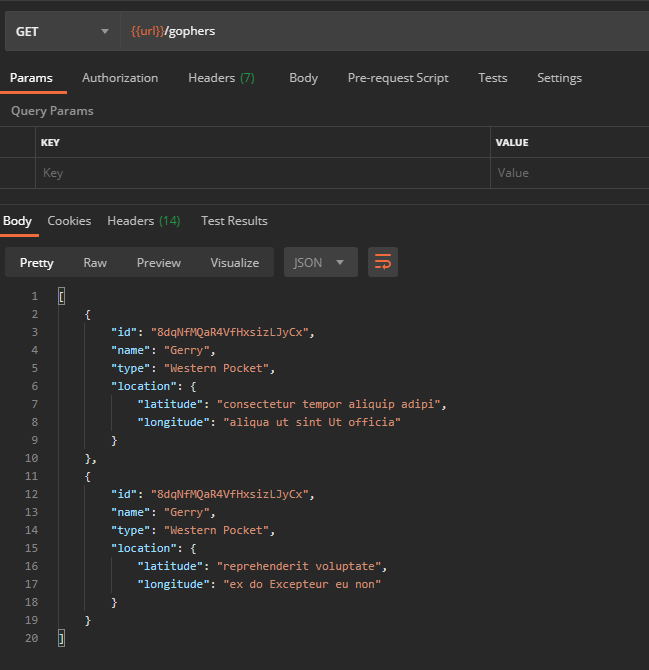
If we click on a request in the collection, select the environment that was created for the mock server, and hit Send we can see an example come back with the values from our OAS file!
Seeing the request and response details will help us get a realistic view of what it will be like to consume our API. From here we can tinker with the definition file, regenerate the collection, and fine-tune our API!
Consistency
When a consumer of your API is up and running, I have news for you - they don’t want to come back and maintain their integration with you. They want to set up once, and have it work forever.
Honestly, not an unreasonable expectation. When I replace a lightbulb in my house, I don’t expect to go back and tighten it every week.
So what does that mean for your API? Well it means two things:
- Reliability
- Backward Compatibility
If you put intentional effort into making your API both reliable and backward compatible, you are going to have happy consumers.
Reliability
When an API is reliable, it has high up-time and consistent results. How do you design for that?
From an API first approach, that means we need to proactively monitor our API so we can catch any downtime before our consumers do. The easiest way to do this is with a test suite.
In Postman, a test suite is a collection of automated requests that build on one another to execute a workflow. The response of one request contains a value we use in the next request and so on.
Test suites not only provide you with reliability, but they also give you the tools to make sure your API is providing consistent results. If the expected outcome is always going to be X, we can write javascript assertions in our test suite to make sure the outcome isn’t Y.
In Gopher Holes Unlimited, we want to build a workflow that automatically validates the following:
- Add a new gopher
- Verify the new gopher returns in the List All endpoint
- Add a hole associated to the new gopher
- Set the hole status to filled
- Verify the hole details were updated
Using the Mock Server collection we generated earlier, we can copy and paste requests into our test suite collection to build that workflow. The collection should look something like this:
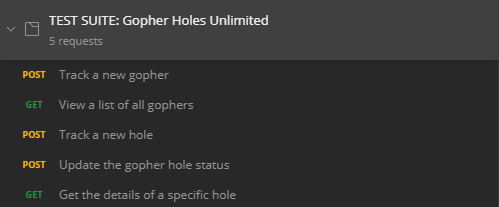
Now all we have to do is throw in some tests and chain the requests together, and we have an automated workflow!
To save time, I built the test suite collection and added it to the GitHub repo. All you need to do is import the collection from the file.
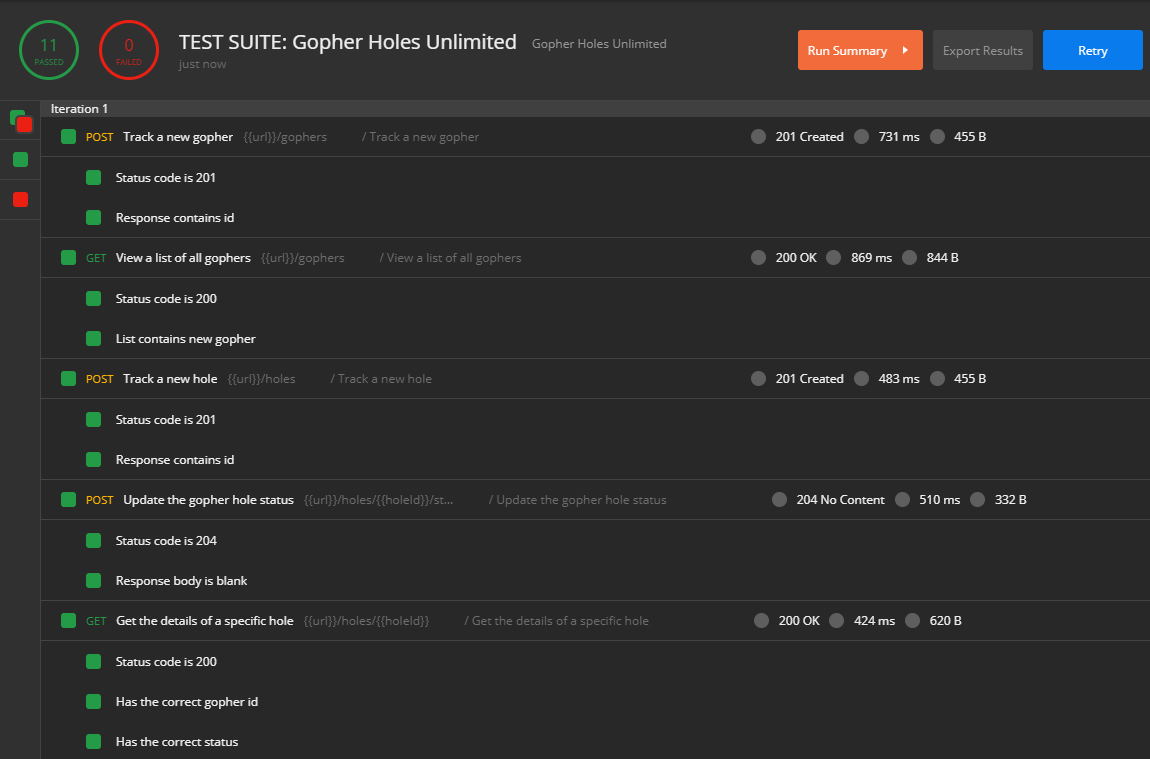
With the automated workflow in place, we now just need to run it at regular intervals to make sure the API stays healthy. Once again, Postman provides an easy way to do this by creating a monitor.
The monitor will run at a certain times of day on specified days of the week and will report back if any of our tests failed. Below, we can see the results of running our automated tests and verify things are healthy.
Backward Compatibility
We’ve all been there. A service we love and use every day suddenly stops working. It worked yesterday, but is failing today.
No, the service isn’t down. They just implemented a breaking change. Whether they knew it or not, they broke it for you. Now you have to go back in and change something in your integration you’ve had working for so long.
You do not want to do this with your API. You design your API with intentionality to avoid breaking changes. Obviously the time will come when you have to make a breaking change, but you can avoid unnecessary breaks if you keep these rules in mind.
- Don’t add new required fields to an API
- Instead, add the fields as optional
- Don’t remove any fields
- Instead, try labeling the fields as deprecated in the documentation
- Don’t change the shape of your responses
- Adding new fields is fine, but don’t start nesting values that weren’t nested before
- Don’t rename fields
- Instead, add the new name as a new field and deprecate the old field name
There are many ways to make breaking changes to an API, but following the four gotchas above should keep you covered for the most part.
If you want to make sure you aren’t unknowingly making breaking changes, you can add a schema validation checker like ajv to your automated tests to verify the shape of the data isn’t changing.
BONUS - you can include your automated tests in your CI pipeline and force the build to fail if your tests fail.
Clear Documentation
Great news! By providing descriptions and examples for every path, request, response, and schema, you’ve already made a huge dent in your API documentation.
A crucial part of an easy to consume API is the documentation. What does this endpoint do? Where does this value come from? What are the acceptable values for this enum?
These are all questions your consumers will have when using your API. It is your job to provide them with answers.
Out of the box, Postman generates beautiful html pages based on a collection. It supports Markdown at every level - offering an opportunity to make a wonderfully styled documentation page that is easy to follow.
If that wasn’t enough, it also provides generated code snippets for developers on how to call each endpoint in their language of choice.
You can also add a custom domain on the generated documentation, meaning I can add the documentation to docs.gopherholesunlimited.com without a problem!
You will want to keep the documentation separate from the mock server collection, so if you navigate back to the API tab:
- Click on the
Developtab - Select Add Documentation > Create new documentation
- Give the collection a name and hit
Create Documentation
Once the documentation collection is created, you can click on the link under the Documentation section of your API and it will take you directly to the generated docs.

The documentation built by Postman will take the information from your OAS file, enrich the request in the documentation collection, then render it on the web with the following:
As with the mock server, you can view the generated output, update the OpenAPI spec, regenerate the collection, and view the updates in the web to fine-tune your API details.
Being a developer myself, when I see documentation like this I know I’m working with a company that knows that they’re doing. They have taken the time to provide meaningful examples, describe every field in detail, and categorize requests appropriately.
Wrap Up
I am just scratching the surface on the possibilities of going API first.
Adding API governance, using the Postman CLI to execute workflows at every step of the build process, and writing dedicated integration documents for third party integrators are all ways you can extend your reach into the API first world.
You have been provided the tools to design and develop your API. All you have to do now is implement it.
Best of all, once your API is implemented, you can simply swap out the url field in your environment and all your automated tests now point to the real thing! You can ensure what you built is right because not only did you build API first, but you also did Test Driven Development (TDD).
Be intentional about your API design. Put your efforts into consumability, consistency, and clear documentation. Become the example other companies look to for reference. Adhere to a standard. Build something great.
**POST** /blogs
{
  content: 'awesome',
  readerEnjoyability: 100,
  shareWithFriends: true
}


Share on:
Join the Ready, Set, Cloud Picks of the Week
Thank you for subscribing! Check your inbox to confirm.
View past issues. | Read the latest posts.